LLM Evaluation Lifecycle
The moat behind every successful AI product is the robust evaluation, or “Evals”. This is what sets your product apart from all other competitors. Through doing Evals, you get a better understanding of your users’ and customers’ needs more than anyone else. You learn what they want from your product, identify where your product falls short, and continuously make concrete improvements. This continuous feedback loop of evaluation and improvement is the key to building a truly exceptional product.
Before diving into Evals, it’s essential to know how to determine the ground truth label - the expected, correct answer. This is usually defined by one domain expert (or group of experts) as the human evaluator, defining precisely what a successful AI output looks like and ensuring alignment with their expectations. The entire LLM evaluation process can then be effectively broken down into three core stages: Analyze, Measure, and Improve.
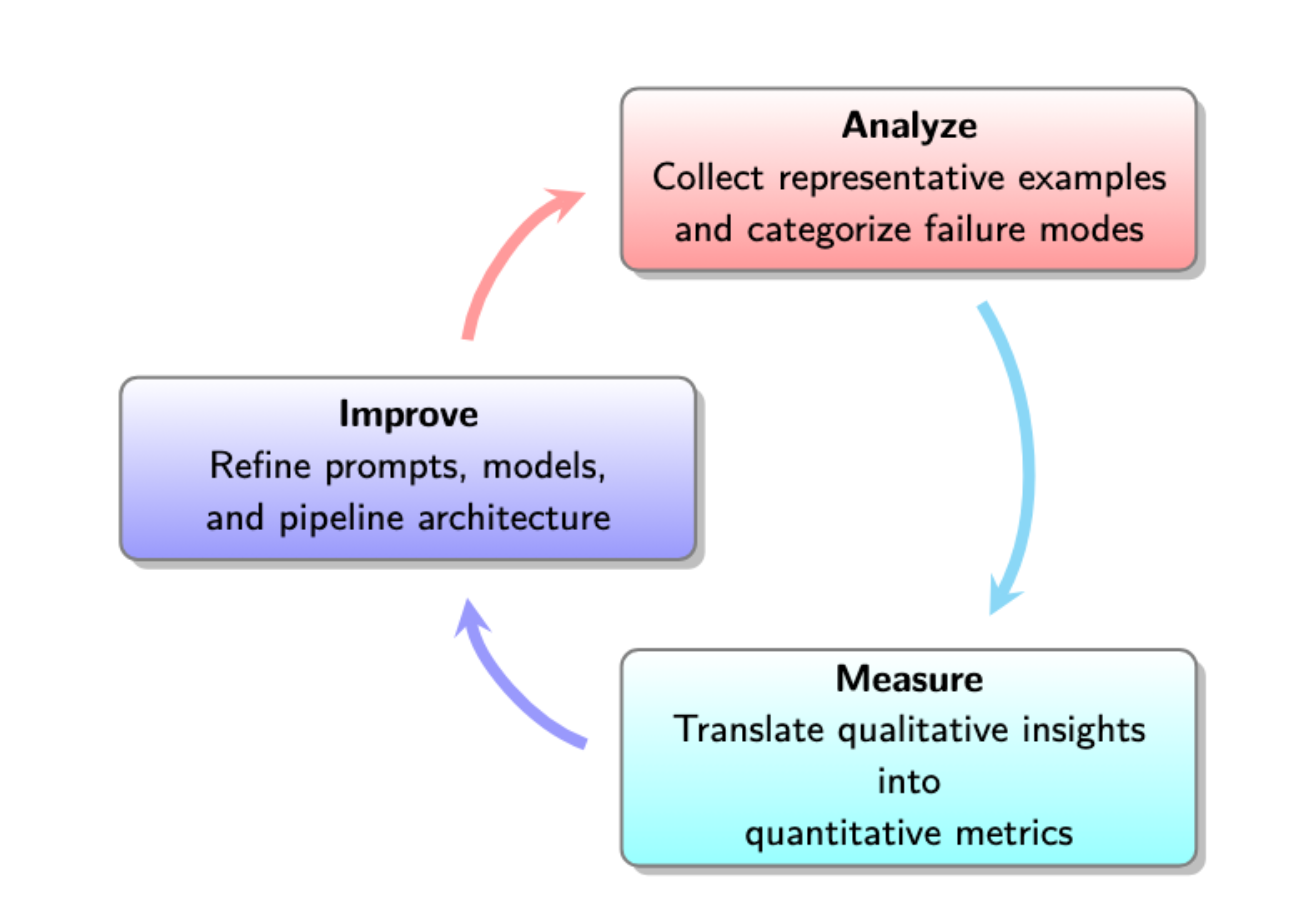
Analyze
The “Analyze” stage is all about understanding what’s breaking in your AI product and how users are actually interacting with it. This deep dive into errors helps you pinpoint exactly where your product falls short.
Here’s how to conduct effective error analysis:
- Generate Your Evaluation Dataset:
- Start by listing every possible realistic query your users might throw at your app.
- Identify the key dimensions of your product (e.g., types of inputs, specific features). Then, create unique combinations (tuples) of these dimensions to generate a comprehensive set of user queries.
- Your Goal: A CSV file containing a unique ID and query for each entry (e.g.,
id, query). (sample)
- Run Traces on Your Evaluation Dataset:
- Feed your evaluation dataset through your AI agent and capture its responses.
- Your Goal: A CSV or JSON file that includes the
id,query, and the agent’sresponsefor each interaction. (sample)
- Set Up Your Annotation App:
- To speed up the human feedback process, build a custom interface. This app will be crucial for “open coding” (detailed individual notes) and “axial coding” (categorizing those notes).
- You can use existing tools like Phoenix or Braintrust, or even build your own through vibe coding using frameworks like HTML/CSS + FastAPI or FastHTML + HTMX / MonsterUI. (tutorial)
- Your Goal: A functional annotation application.
- Open Coding (Detailed Human Feedback):
- Go through each recorded trace manually. For every interaction, provide detailed human feedback and notes on what went well or wrong. Think of this as jotting down all your raw observations.
- Your Goal: Your traces CSV/JSON file will now be updated with these detailed
open_codingnotes.
- Axial Coding (Categorize Failure Modes):
- Now, take your open coding notes and categorize them into specific “failure modes”. This means grouping similar issues together (e.g., “hallucinations,” “irrelevant responses,” “misinterpretation of intent”).
- You can even leverage an LLM to help you generate a taxonomy of these failure modes with a well-crafted prompt.
- Your Goal: Your traces CSV/JSON file will be further updated with the
axial_coding_code, giving you clear insights into recurring problems.
Measure
The “Measure” stage is dedicated to quantifying the performance of your AI application. This is where you establish clear metrics to understand how well your product is meeting its objectives.
Here’s the typical process for measuring the performance of LLM applications:
- Define Your Evaluation Dataset: Begin with a fixed set of user inputs (e.g., 100 queries). You can start by using inputs from the “Analyze” step that represent diverse scenarios, but it’s crucial to continually add new inputs encountered from real-world production use cases.
- Generate Application Responses: Run your application on this evaluation dataset to generate responses for each input.
- Label Responses with Pass/Fail Criteria: Based on precise, predefined definitions of success and failure (often derived from your “Analyze” phase’s failure modes), label each generated response as either “Pass” or “Fail”.
- Calculate Performance Metrics: Aggregate your labels. For instance, if 85 out of 100 responses passed and 15 failed, the application’s performance for the evaluated criteria is 85%.
This systematic approach allows you to make targeted improvements to your application and then re-measure performance to objectively verify the impact of your changes.
Automating Evaluation: Different Outputs, Different Evaluators
Manually labeling responses (Step 3) is often the most time-consuming part of the evaluation process. To make this more efficient and scalable, we can automate the labeling process by creating automated evaluators. However, the choice of automated evaluator depends critically on the type of output your AI system produces.
In most LLM applications, outputs generally fall into two distinct categories: generative and structured. These types differ significantly in how their performance is best measured.
Generative Outputs
Generative outputs are free-form, creative, and inherently non-deterministic. This means the same input can yield varied, yet equally valid, outputs. Because there’s typically no single “correct” answer, evaluating generative outputs is more complex and often subjective.
To measure performance effectively for generative outputs:
- First, conduct thorough error analysis (from the “Analyze” stage) to identify specific failure modes (e.g., factual errors, tone issues, hallucinations, lack of coherence).
- There is often no single “ground truth” since, due to their subjective and varied nature, comparing generative outputs typically involves human judgment or qualitative assessment rather than a direct, objective reference.
- For each narrow, clearly defined failure mode, you can then define a precise Pass/Fail metric. This approach allows for multiple performance metrics, each targeting a specific failure area, enabling modular and systematic improvement.
Structured Outputs
Structured outputs, as the name implies, adhere to a predefined and deterministic format, such as JSON objects, key-value pairs, or fixed fields. Because the structure is known in advance, evaluation becomes much more straightforward.
To measure performance effectively for structured outputs:
- You typically have ground truth data – the exact expected output – which can be used as a direct reference.
- This allows for immediate computation of performance metrics without requiring prior extensive error analysis.
- Evaluation is typically done using a Pass/Fail method by comparing the AI-generated output to the ground truth, often requiring an exact match or meeting specific field-level criteria.
Types of Automated LLM Evaluators
Given the different nature of LLM outputs, there are two primary types of automated evaluators used to measure performance:
Code-based Evaluators
- Primarily Used For: Structured outputs.
- How They Work: These evaluators use programmatic logic (e.g., Python scripts, regex, JSON schema validation) to deterministically compare the AI’s structured output against a predefined ground truth or set of rules.
- Alignment: They are deterministic, ensuring 100% alignment with the defined ground truth when the output format and expected values are precise, making them highly reliable for labeling evaluation datasets automatically.
- Considerations: They are efficient and fair for production use as long as their latency is minimal.
- Metric: Pass/Success Rate ( \(p_{\text{obs}}\) )
LLM-as-Judge Evaluators
- Primarily Used For: Generative outputs.
- How They Work: You build this evaluator for each single, narrowly scoped failure mode. A separate LLM (the “judge”) is prompted with the user query, the AI’s response, and a clear rubric or set of criteria. The judge then assesses the response and assigns a “Pass” or “Fail” label (or a score).
- Alignment: Since LLMs are inherently non-deterministic, you need to calibrate the LLM-as-Judge evaluator to align its judgments with human expert ground truth labels through careful prompt engineering and validation.
- Considerations: Best used only for evaluation purposes. While optional for production, be mindful of additional latency and cost. If an LLM judge flags a response in production, you can show it, regenerate a new response, or explain the failure to the user.
- Metric: Corrected true success rate (\(\hat{\theta}\))
Aligning LLM-as-Judge Evaluators
Here are the steps to align an LLM-as-Judge evaluator, assuming you already have traces on your evaluation dataset after performing the “Analyze” step:
- Define the Failure Mode to Evaluate: Clearly identify the specific failure mode you want the LLM-as-Judge to evaluate (e.g., “hallucinations,” “irrelevant responses”).
- Manually Label Evaluation Dataset: For the defined failure mode, manually label a subset of your evaluation dataset with “Pass” or “Fail” based on human expert judgment. This creates your ground truth.
- Train-Dev-Test Split: Divide your manually labeled dataset into distinct sets. You can use random splitting or stratified splitting (to ensure similar label distribution across sets).
- Training Set (15% of labels):
- Purpose: Provides the clear “Pass” and “Fail” few-shot examples you put directly into your judge’s prompt.
- Development (Dev) Set (40% of labels):
- Purpose: To iteratively test and refine your judge prompt.
- Compare judge’s output (Pass/Fail) against your human labels for this set.
- NEVER include Dev Set examples in the judge prompt itself!
- Test Set (45% of labels):
- Purpose: Final, unbiased evaluation of the judge’s accuracy (TPR/TNR) after all prompt tuning is done.
- NEVER look at this set during prompt development!
- Training Set (15% of labels):
- Train the LLM-as-Judge evaluator
- Develop Judge Prompt: Craft a prompt for the LLM-as-Judge that includes:
- The specific task/criterion (focused on one specific failure mode).
- Precise “Pass/Fail” definitions.
- 2-3 clear few-shot examples (input, AI agent output, desired judge reasoning, and “Pass/Fail” label) taken from your training set.
- The structured output format you expect from the judge (e.g., JSON with reasoning and answer).
- Evaluate on Dev Set: Run the LLM-as-Judge on the development set and calculate its True Positive Rate (TPR) and True Negative Rate (TNR).
- Save Judge Prompt and Predictions: Store the judge prompt, its predictions, and the performance metrics from the development set evaluation.
- Improve LLM Judge: Iteratively refine the judge prompt (e.g., simplify criteria, improve examples) or consider using a more capable LLM as the judge if performance is not satisfactory.
- Repeat: Continue refining and evaluating on the development set until TPR and TNR are satisfactory (e.g., >90%).
- Develop Judge Prompt: Craft a prompt for the LLM-as-Judge that includes:
- Evaluate on Test Dataset: Once satisfied with the development set performance, evaluate the LLM-as-Judge on the unseen test dataset.
- Metrics: True Positive Rate (TPR), True Negative Rate (TNR)
- Optional: Balanced Accuracy ((TPR+TNR)/2), # of Total Predictions, # of Correct Predictions, Accuracy
- Save the test labels and predictions. These will be used later to calculate the judge’s corrected true success rate.
Calculating the Corrected True Success Rate (\(\hat{\theta}\))
Unlike code-based evaluators that provide a direct pass rate, LLM-as-Judge evaluators require a more nuanced metric to reflect their alignment with human judgment. The corrected true success rate (\(\hat{\theta}\)) accounts for the judge’s accuracy against human expert labels, providing a more reliable measure of your AI system’s performance.
Here’s how to calculate the metric (Measure on “New” traces):
- Prepare Traces: Use all the labeled traces or new production traces.
- Run Judge: Run the LLM-as-Judge on these traces to get its predictions (binary 1s/0s for Pass/Fail).
- Calculate Corrected True Success Rate: Using the test labels, test predictions, and the new trace predictions, calculate and save:
Improve
The “Improve” stage is where you leverage the insights from “Analyze” and “Measure” to make concrete enhancements to your AI system. This step is critical for closing the feedback loop and ensuring continuous product evolution.
It’s vital not to skip the “Measure” step before making changes. Without quantitative measurement, you risk making subjective improvements based on “eyeballing” responses. This doesn’t guarantee actual system improvement; you need to quantify the impact of your changes to confirm real progress.
Here are common strategies to improve an LLM system:
- Set Model Parameters: Adjusting parameters like temperature, top-p, or max tokens can significantly influence the model’s output, affecting creativity, conciseness, or adherence to instructions.
- Prompt Engineering: Refining your prompts—through techniques like clear instructions, few-shot examples, or chain-of-thought prompting—can guide the LLM to produce more accurate and desired responses.
- RAG / Tools (Retrieval Augmented Generation): Integrating external knowledge bases or tools allows the LLM to access and utilize up-to-date, specific, or proprietary information, greatly enhancing its factual accuracy and capability.
- Fine-tuning: Training a base LLM on a smaller, domain-specific dataset can specialize its knowledge and behavior, making it more performant for particular tasks or styles.
- Choose a More Capable Model: Upgrading to a newer, larger, or more advanced LLM can inherently improve performance, especially if your current model struggles with complexity or nuanced understanding.